Monday, September 26, 2011

The Farrar's, Eco-Friendly?

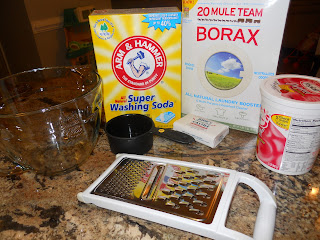
Well, I am not exactly sure of what came over me today!!  I think the main reason I decided to do this whole project was because I am almost out of laundry detergent!!  So... instead of buying more, I started researching high efficiency home made detergent recipes!!  I found one that I really liked the ingredients on, and I went to the store to purchase everything!

I had to buy the following items, and here is what everything cost me...
  • Borax - $3.99  and this bought me a 78oz box!!
  • Arm & Hammer Washing Soda - $3.29  and this bought me a 55oz box!!
  • Kirk's Castile Soap - $4.49  and this bought me a pack of 3 4oz bars!!
Total for this project  $11.77, and a new bottle of detergent would have landed me $13.99.  I use the cheap stuff too, nothing fancy!!  So, I saved money and I can make enough for 96+ loads of laundry vs. the 64 loads the other would have gotten me! 

The directions of this detergent were DUMMY PROOF!  That is exactly what I needed!  Grate an entire bar of soap finely, add one cup of each borax and washing soda.  Stir thoroughly... and that's it!
I think the biggest thing that scared me off from doing this before was the idea of making BUCKETS of detergent at a time!  I don't have the storage for that kind of thing!!  This was the first recipe I had seen that was a smaller amount and high efficiency friendly!  Basically high effciency simply means low suds.  Thinking about that... it means in reality when you are paying more money for the HE tag to be on the bottle, you are actually getting less detergent and more water!  NO THANKS!!
I took an empty yogurt container and jazzed it up with a little scrapbook paper... filled, and done!
I am very excited to try it!  When we run out of Downy, I will be making my own fabric softener too!! 


 I also picked up 3 spray bottles at Target and made my own cleaners!  Now I have a homemade glass cleaner, all-purpose cleaner, and a vinegar & water bottle for everything else!!  I am pretty excited that my cleaning cabinet just got a revamp and that everything is homemade with EASY ingredients that for the most part... I already owned!!
  •  Glass Cleaner - Ammonia, Vinegar, Water, and a few drops of my favorite scented dish soap...
  • All-Purpose - Vinegar, Borax, Water, and a few drops of my favorite scented dish soap...
  • Vinegar & Water - if you have to ask, you don't deserve an answer!!

Lastly I purchased a Rubbermaid Reveal Mop, and I am in LOVE!!  I mixed my own cleaner in the bottle, mostly water with some Mr. Clean with Febreze filled to the solumtion line!  The mop head is HUGE, and I get a room done so much faster!!  I live in a 2200 sqft house, and half of it is hardwood floors!!!  I needed a good mop!  The best part is, after mopping day, I just throw the pad in the washing machine! I can wash it 100 times before I need to purchase another one!! 

So that about sums up my "Mommy Went Green" day!!  I really didn't wake up this morning and say "I'm going green, and today is the day", but look where the day took me!!  I am in a good mood and ready to do some cleaning, tomorrow!  Its bed time!!

 - Jessica

Tuesday, September 20, 2011

4 Blissful Years...

This Thursday, September 22, marks our 4th Anniversary together!  That's right, 4 years ago, I married my best friend, and we have been driving each other crazy ever since!  It's amazing to me to look back on the last 4 years and see where our married life has taken us!  We moved twice, once to another state.  We have had a baby, and are expecting our 2nd.  And I found a career as a stay at home mom, while Derik has been promoted to owning his own Fleming's!  A lot can change in 4 years, and that really isn't a long time!


Well, another anniversary (in our house) means another REALLY hard shopping trip!  We both have the hardest time shopping for each other on our anniversary, especially since we have 2!!  (You have to know us really well, to know the details there!!  It will be interesting to know who reads this, by the number of questions I get about that topic!!!)  Anyways... we usually stick strictly to the traditional anniversary gifts!  The first 2 years... I failed miserably at this, while Derik put me to shame!  Year 3... Derik was stumped to say the least!  I got a leather luggage tag!  When I opened it, he said IM SORRY!  I got him a wallet, and the year before he got me a onesie (I was pregnant!!) while I gave him a bag of cotton balls!!!  We have taken turns at being the bad gift giver!!!

This year the gift is supposed to be Flowers & Fruit.  Seriously when I read it I thought, WHAT???  If I send Derik flowers, everyone will make fun of him!  So, I thought I would send him an Edible Arrangement!!!  That mixes both, and he will love to eat it!  After pricing that out, I decided it wasn't worth it!  $70 for an arrangement of fruit... no no!!  So, I took it upon myself to create something similar!

My original thought was to take pineapple slices, make them flowers, dip them in chocolate, and add cantalope melon balls in the middle... well, that didn't work!  I have never cut a pineapple up before, and it made the biggest juicy mess EVER!  So, thankfully I had a plan b!  I made sugar cookie dough, and cut out flowers!  I made little cookie balls for the center of the flower and put a little icing under to make them stick!


 Of course, I had to let Abbie try one!  She didn't like it at all... hahaha!  She stuffed the whole thing in her mouth and backed away, like DONT YOU TRY TO TAKE THIS AWAY FROM ME!

After I got the chocolate heated up, I drizzled the cookies with chocolate, and added some sprinkles!  

For "garnish", I dipped strawberries, cut up bananas, and pineapple pieces in chocolate and used them to decorate with!  

After putting everything on the plate, it kind of became a mound of chocolate, but who is going to complain about that!!  So, to close... Derik has flowers and fruit for our anniversary!!  TOP THAT BABE!!!  Just kidding... but I think my gift qualifies me for the good gifter category this year!

I love you so much, Derik.  Even though we have our ups and downs... you are my best friend, and I am so glad that you gave me the opportunity to spend the rest of my life with you!  Happy Anniversary!

 - Jessica

Monday, September 19, 2011

My Momager Binder...

As my love for pinterest has intensified, so does the organization around my house! I can say that the Farrar household will never be the same!! I have been hard at work on my next project, and I am finally at a "finished" point! I think that this project can always be one that is "open", and still under construction, but I am pleased with what I have so far!! I have seen Family Binders before, but I never really thought we needed one. When the first babysitter was called, I realized I need to have some information in a central location before I leave Abbie with someone new... enter Our Family Binder!

I made the front cover, and after we have a name for the baby, I will have to reprint it!  But, I thought it was rather stylish!!!  I liked the monogram in the middle!

The first page of our Binder has our Family Rules.  They are rules I pulled from something I saw on Etsy, and I really liked them!  In the front pocket I keep my laminated Grocery List, and Babysitter Info sheet.  They are laminated so I can use them over and over!

The first tab is for our Important Phone Numbers.  I listed all of our doctors, local hospitals, friends that I hang out with, and places I may be... that way if Derik or a babysitter need me... I can be reached!

The next tab is for Important Dates.  The first page is January through June, and has anniversaries, birthdays, and other dates that need remembering listed!

The 2nd page has July through December...  hopefully I will stop missing birthdays this way!

The next tab is for all of the MOPS information!  This is more for Derik than a sitter, but I wanted him to have easy access to information about where I am and when I am there!

Abbie has her own tab, as will the baby!  It lists her birthday, social security, blood type, and any major medical history bullet points that a sitter may need in an emergency!

As I said before, it is still in progress!  I am working on getting a calendar of the year, and list of holidays, as well as putting together a list of numbers for our favorite takeout places!  Some binders contain finance information, cleaning schedules, and maintenance graphs... but we do all of that stuff in other ways!  This is the best system for our family, and I am proud of myself for putting it together!!

 - Jessica

Tuesday, September 13, 2011

My First Wedding...

This weekend was fun, gorgeous, and most of all... eventful! Almost 4 years ago to the date, September 22, 2007, I walked down the aisle to marry the man of my dreams! I had planned that day for over a year, and it was everything I had ever dreamed it would be! I was so proud of everything I had done, and how it all came together flawlessly (or at least it seemed that way)!! I remember my friends and family telling me some of the horror stories of the day afterwards, and I laughed because I never knew about any of it! The florist was 4 hours late, a set of my grandparents almost didn't make it to the wedding, and all of the remaining wedding cake "vanished" into the kitchen, never to be seen again! As all of these things definitely had an impact on our day, none of them affected my mood! I stayed clueless, and happy!
So, when I offered to be the Coordinator at Megan & Steve's wedding, that was my biggest goal! After my wedding, I thought a career of Wedding Planning was in my future. After some research, I found that 9 out of 10 home based Wedding Planning businesses fail in the first year! So, I changed my mind! Megan had done all of the leg work for her wedding! She found the vendors, venue, and every detail was done! So, coordinating the wedding should be easy, so I thought!
Friday evening, the rehearsal went rather smooth. It was such a pretty location, and it seemed as though there really wasn't much for me to do! Megan asked me to be at the venue around 2pm the following day, so that I could begin building her reception area, and create the day she had been planning!
Saturday went a little like this!!!

8am - Breakfast! The Hampton Inn had a pretty good breakfast, and I am very glad! I didnt realize how long the day would be, and I am glad I ate well!

9am - Derik and I make a WalMart run! WalMart on a Saturday is NEVER a good idea, but WalMart 20 mins away, on a Saturday, in a hurry... really stupid! We needed to get 3 vases, bug repellant, and itch relief for bug bites though! So, off to WalMart we went!

10am - Arrived back at the hotel, and collected all of the goodies that Megan had for the afternoon. Loaded my car, and went to get ready!

10:10-10:45 - We were lazy! I wanted to go to the pool, but since the time frame was small, we watched something about 9/11!

11:30 - After spending the better part of an hour curling my hair, I realized I forgot hairspray! Did I think of that at WalMart... NO!!! So, I headed to the little store at the front desk and bought a travel size bottle of hairspray that cost me $3!!! Oh well!

12:10 - We were both finally ready and heading to the car! We were scheduled to make a stop at the Mother of the Bride's house, to pick of the rest of the wedding stuff! We loaded the car, and realized that I had left all of the vendor information at the hotel!

12:30 - Headed back (8 miles in the wrong direction) to the hotel to get lists! During the drive we realized, its lunch time and we were hungry! We stopped at a diner that was right next to the hotel, and hovered a quick (and may I add not so good...) lunch!

1:30 - We arrive at the Whalehead Club, and find no one! This wasn't surprising since we werent expecting them until 2!

1:45 - Derik and I notice that the chairs are at the ceremony location, and we go to take care of aisle runner decorations, and to our surprise, goose poop in the aisle cleanup!!


2:45 - The photographers (who have been checking out the area for picture ideas) inform us that the bride will be here in 15 mins to pick them up in the limo! This was a problem, because there were still no tables and chairs!! This meant that the catering company hadnt arrived yet, and no decorating had begun! The photographers made it a non issue, by meeting the limo at the gate, and not allowing the bride to see how behind schedule things were!

3:30 - The catering company arrives, and begins setting up the tables! The chairs were at the ceremony location, so now that we had a tent setup... we started going down the list of things to do! Although I was nervous in less than an hour, we had really busted it out!


4:30 - The first real disaster presents itself! The cake company arrives only to tell me that the cake was destroyed on its journey to us. As I panic, and try to figure out the best way to handle the situation, Derik took charge! We had all sent the delivery guy off to find us another cake. Derik sent the head of the catering company to the closest grocery store, and had a sheet cake ordered. We will call that plan C! Because 25 mins later the delivery guy called and said he had another cake! We told him to have it there no later than 6, and headed to the ceremony location!

5:00 - The wedding started on time without a hitch! It was gorgeous, such a perfect day! The bride looked stunning in her dress, and of course, I started crying!


5:30 - The ceremony was over, and I was back in the reception tent! The guests brought the chairs to the tent, and that transition was perfect and smooth! Cocktail hour got under way, and the guests never noticed we still had no cake!

5:55 - Cake #2 arrives, and it is NOT a cake that the bride would like, but at this point there was no turning back! We kept the bottom layer of her cake, so she could have some of the correct cake! The cake was placed on the table, and the reception got under way!

6:30 - Guests head to the tent to be seated! After all of the guests (expect 8 people) were seated we realized we were short 2 tables, but most importantly, we were short chairs! After a mild anxiety attack, we grabbed 2 picnic tables close by, and covered them with table cloths! Everything seemed to be set!

6:45 - The Wedding Party introductions began, and the newlyweds had their first dance! The bride didnt notice that the cake was wrong until she was dancing with her dad. Her dad was totally aware of the situation, and helped ease the tension.

The night went on without any other major glitches! Thankfully, the bride and the groom had a great night, and the bride said that everything (except the cake) was perfect!


Will I do more wedding coordinating in the future??? Not while I am pregnant!! Derik's ultimate dream 20 years is to open a "Bed & Breakfast" style venue at the beach. He wants to have an area where couples can get married and hold a reception. He will of course head the catering part, and I would be in charge of the coordinating part!


We made a pretty good team at the wedding! But, for now... 20 years is a LONG time off, and we will see what the future holds for our family!

Wednesday, September 7, 2011

It's a "Build a Fort" kind of day!

It's one of those rainy, super nasty days outside. One where you really want to stay in your jammies, watch old movies, eat popcorn, and take a nap!!

We made it a pj day for sure, and after classroom, I battled with ideas to keep Abbie occupied!! On a rainy day (especially a pouring down rainy day) taking Abbie out of the house is just NOT an option!!
I tried coloring, but Abbie loves to color and we do it just about every day, so that was nothing special, and didn't keep her occupied very long!!

After running MANY unsuccessful ideas through my head, I thought building a "reading fort" for Abbie would be a fun idea!!
So did she!! She loved it, and it kept her occupied until lunch time, which was my main goal!


Heading in to check everything out!


She is pretty excited!


Exploring...


Testing out the seating...


Alright, this fort rocks!


Doing a little light reading!


 Alright, MOM... get out of my fort!


- Posted using BlogPress from my iPad

Sunday, September 4, 2011

A Unique Gift

Derik's God Sister & close family friend, Megan, is marrying the love of her life, Steve, this coming weekend!! We are so excited to be a part of their special weekend, and I wanted to make them a special wedding gift that they could treasure for years to come!

I took their wedding invitation and deconstructed it!! I cut the invitation into strips and curled all of the pieces, and used them to fill a glass Christmas tree ornament! I finished the ornament with ribbon to match their wedding colors, and a mini charm from the invitation. I used the actual charm that was on the envelope on top of the storage box. That way when all of the ornaments get packed away each year, they will have a home for this ornament!!
I love how it turned out and I hope that Megan & Steve do too!!


The finished ornament!


In the storage box...


Pretty lid, finished with a piece of the invitation!


- Posted using BlogPress from my iPad

My new Grocery List

I decided that I was tired of writing out grocery lists and throwing them away!  Derik and I had been taking pictures of the list on the fridge for a while, but as my mom brought to my attention... you cant mark things off of that list.  That is not a good thing!!  I have come home without vital staples needed for my Eat Sheet Meal Plan!  So, I mapped out my grocery store in the most basic way possible!

I came up with just 6 categories... and everything that our family uses, falls into one of them.  Your family may be different, and your grocery store may not be laid out like mine, but it of course can be customized for you!  Some people may want to do cereal, pet products, baby food, etc, and get specific on the aisles.  I didnt want to do that, but you can print more on the back side of the sheet!


The categories I used were

Produce
Pantry
Meat
Deli
Cold Items
Frozen

I laid them out on a table in the areas that they are in our grocery store!  I printed the list, and laminated it!  Now I can plan my meals, make my list, and organize my shopping trip, so that I dont miss anything!  I will use a Wet Erase Marker, so Abbie doesnt grab the sheet and wipe it all away!  Hope this works... cause I am super excited!

Here is a download of "The Grocery List for Dummies"... enjoy!

 - Jessica

Saturday, September 3, 2011

Cake Pop Test Run...

After spending a morning on my favorite website, pinterest.com, I came across my 2nd favorite website bakerella.com!  I spent at least an hour looking all through Bakerella when I found this amazing site, and came across the "Cake Pop" Section!  I have always been a fan of cake pops, but I never thought it would be something simple that I could make in my kitchen!  After reading about how to do it... I decided I would take a stab at it!  This will be my first "cooking blog", so bare with me!

We have a Labor Day Cookout on Monday that we are invited too, and I thought that would be the perfect crowd to test my cake pops on!  I thought since we are in September, I would opt for a FALL theme, and I picked out sprinkles and chocolate based on that theme!  I had a LOT of fun shopping for the "goodies" and I had some help from my wonderful friend, Stacy!


In preparation for today's activity, I set out 3 eggs and a stick of butter last night, which is simply what the cake mix called for!  I chose yellow cake, and went with a Betty Crocker Super Moist Butter Yellow Cake.  I chose Betty Crocker Whipped Butter Cream Frosting to mix into the cake, after it cools of course!

I also selected Wilton Candy Melts to coat the cake pops with in red, orange, and brown.

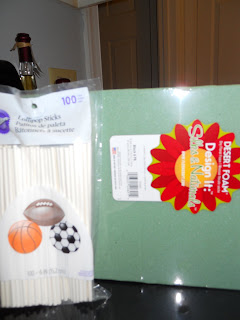
     I got coordinating fall colored sprinkles, 6" lollipop sticks, and floral Styrofoam blocks.

I purchased green Styrofoam over white because of the price difference, but I decided that I would wrap my blocks with scrapbook paper, so created a little display for the cake pops!


BAKING THE CAKE

I baked the cake according to the instructions on the box.  It called for
1 Cup Water
1/3 Cup Butter
3 Eggs
Cake Mix

I mixed everything in the mixer...

Poured into a 9x13 glass baking dish, and baked for 30 mins...

I am sure that bake times will vary with different ovens, but I used my cake tester in the center of the cake after 30 minutes, and it came out clean!

Yummy!


Making the Cake Balls

After allowing the cake to cool completely on a wire rack, I crumbled it into a bowl and added half of the can of frosting to start.  Bakerella says to use the whole can, but since I used Super Moist cake, I started light and added as needed!

I used my hands to mix it all up, and it was messy!

 After mixing the cake and frosting, I rolled into balls...

...and placed on a plate covered with wax paper.  

I placed the plate in the freezer for 30 minutes to allow the cake balls to get hard and ready for chocolate coating!  I inserted the lollipop sticks into the cake balls before I put them in the freezer.  I thought it would help the cake adhere to the sticks a little bit better.


Adding the Chocolate Coating

I melted my first color of chocolate, orange in the microwave.  As much as I would LOVE to have a Double Broiler... I do not own one, so the microwave would have to work...or so I thought!  I melted in 30 second intervals, at half power, so I wouldn't burn the chocolate.  I stirred between each 30 second interval.  And the chocolate never got to a liquid stage.  It made more of a "frosting" :(.

So, Derik rigged me a double boiler, and we tried another method!  The chocolate was still not melting enough, so we added some water to thin it out.  I would have added milk, but we (of course) ran out this morning!


When the chocolate was smooth I rolled the pops in the chocolate and covered in sprinkles!  

I repeated this process with the other 2 colors, and when they were all finished... I allowed them to dry before tasting!  Working on my last color...

My final product wasn't as pretty and "finished" looking as I was hoping, but anyone who knows me knows I am a perfectionist!  So... for my first attempt at this... I will take a B- and be proud of it!

WARNING:    I will warn anyone who wants to try these delicious little treats... its an all day ordeal!  Make sure you have plenty of time!  I started this process around 9:30am this morning and I am finished at about 2:15 this afternoon!  Allow yourself enough time (and include some "test" pops!)

 - Jessica